The RingCentral Web Widget demo for Salesforce Lightning is a simple demo that show cases the following use cases:
- Click-to-Dial
- Inbound Screen-Pop
- Call Logging
This demo is located in the salesforce_lightning folder.
Note: There is a follow-on demo that builds on this and will create additional screen-pops for Google Search and LinkedIn Search in the salesforce_lightning_plus folder. This consists of just one additional line of JavaScript for each serach.
Contents
- Installation
- Create a RingCentral App
- Clone the repo
- Add the Widget to Salesforce
- Integrations
- Click-to-Dial
- Inbound Screen-Pop
- Autoamtic Call Logging
- Summary
Installation
To install this demo, clone the repo and load the file in your browser:
Create a RingCentral App
Create an app with the following characteristics:
| Property | Setting |
|---|---|
| Platform Type | Browser-based |
| Grant Types | Authorization Code or Implicit Grant |
| Permissions | see ringcentral/ringcentral-web-widget |
Clone the repo
git clone https://github.com/ringcentral-tutorials/ringcentral-web-widget-demos
Add the Web Widget to Salesforce
To add the RingCentral Web Widget, we need to create a Salesforce Call Center with the Visualforce page and then add users that want to use the Web Widget to the Call Center.
Create the Salesforce Call Center
In Salesforce Lightning create a Salesforce Call Center using the following steps:
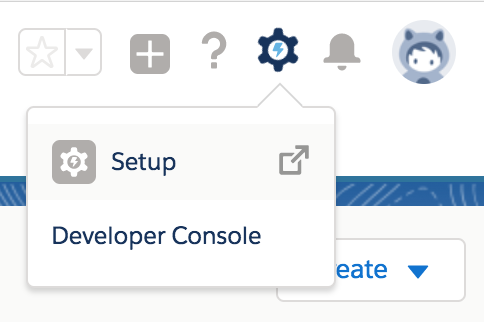
- In Salesforce Lightning click
Setup
-
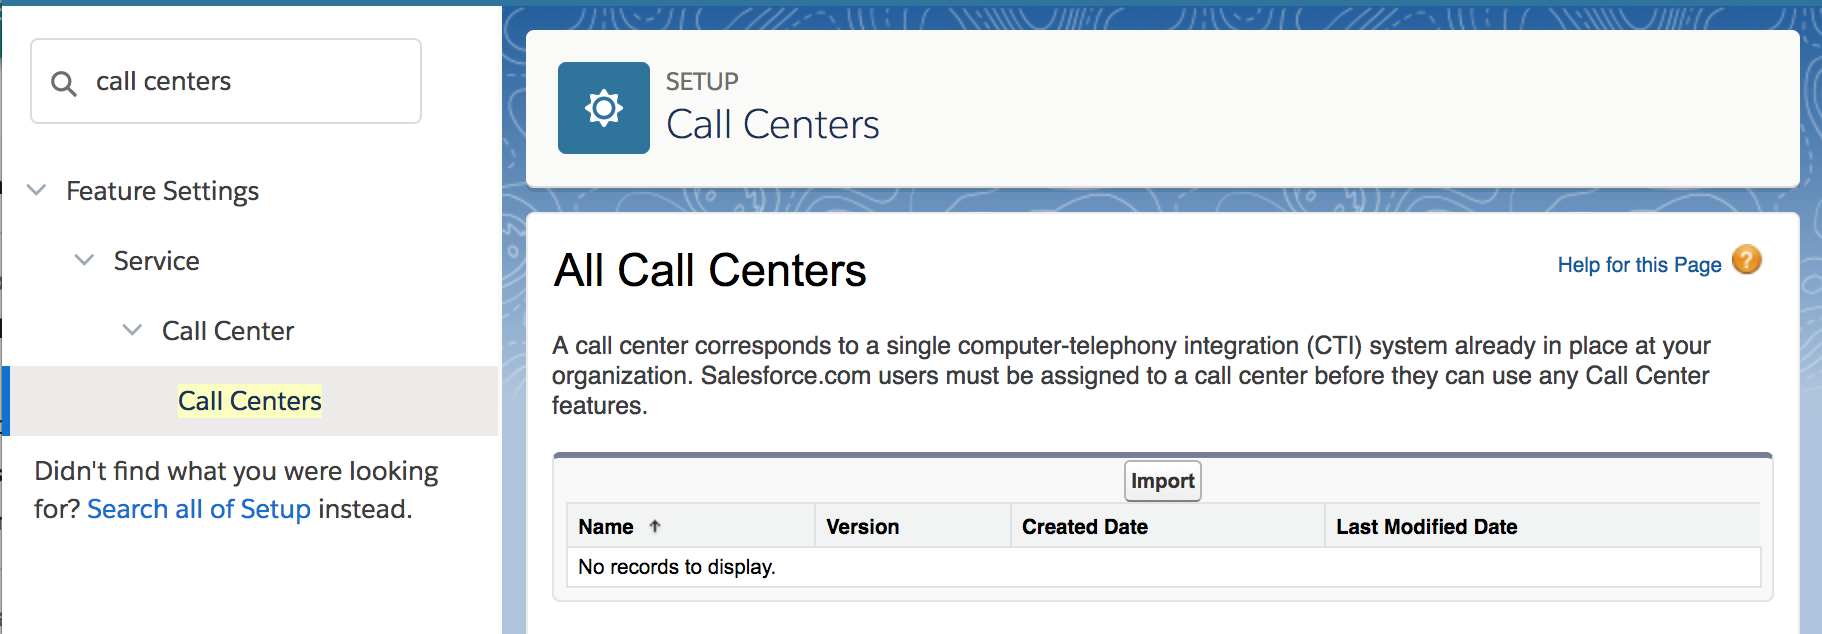
In the Quick Find, type
call centersand then click Call Centers. -
If you see a "Say Hello to Salesforce Call Center" introduction page, click Continue.
-
Then click the Import button and select the XML file.
You can create a file similar to the below or import the salesforce_demo-1.0.0_config_CallCenterDefinition.xml file.
You can change the settings in the XML file. The following are of note:
- The Display Name is set to "RingCentral Call Center Adapter Open CTI"
- The CTI Adapter URL is set to
/apex/RCPhone
<callCenter>
  <section sortOrder="0" name="reqGeneralInfo" label="General Information">
    <item sortOrder="0" name="reqInternalName" label="Internal Name">RingCentralAdapterOpenCTI</item>
    <item sortOrder="1" name="reqDisplayName" label="Display Name">RingCentral Call Center Adapter Open CTI</item>
    <item sortOrder="2" name="reqAdapterUrl" label="CTI Adapter URL">/apex/RCPhone</item>
    <item sortOrder="3" name="reqUseApi" label="Use CTI API">true</item>
    <item sortOrder="4" name="reqSoftphoneHeight" label="Softphone Height">550</item>
    <item sortOrder="5" name="reqSoftphoneWidth" label="Softphone Width">300</item>
    <item sortOrder="6" name="reqSalesforceCompatibilityMode" label="Salesforce Compatibility Mode">Lightning</item>
  </section>
</callCenter>
- After you have created the Call Center, click Manage Call Center Users and then click Add More Users.
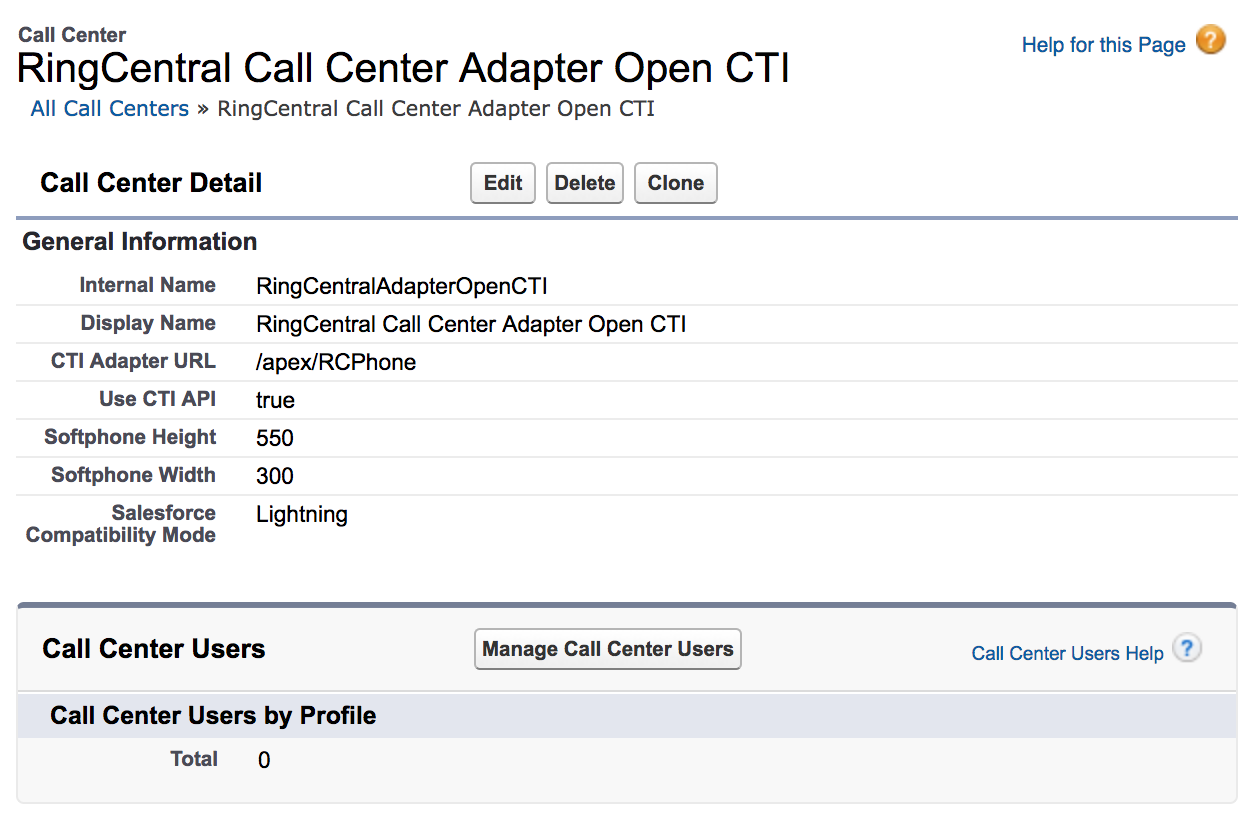
- Use the Find button to select the users you wish to use the RingCentral Widget, select the users and then click Add to Call Center

Create the Widget Visualforce Page
Create the Widget Visualforce Page
- Open the Developer Console by clicking the gear icon in the upper right corner.

- Create a new Visualforce page by clicking File > New > Visualforce Page
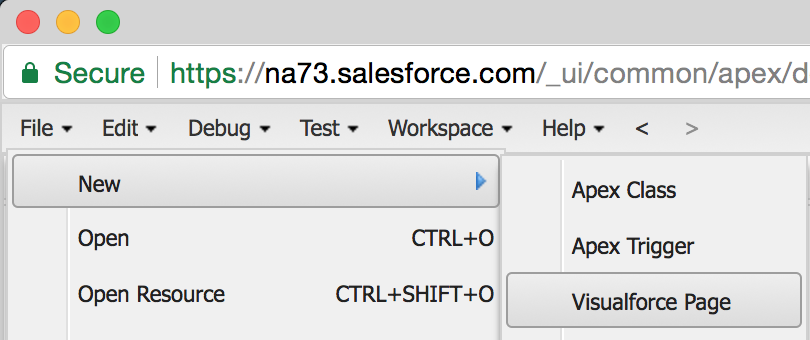
- Replace the content of the page with the following HTML. Save the page by clicking File > Save
<apex:page>
    <style>
        .hasMotif {
        margin : 0px;
        }
    </style>
    <apex:iframe src="https://ringcentral.github.io/ringcentral-web-widget/app.html" height="500" width="300" frameborder="false"/>
</apex:page>
Add the Widget to Your Salesforce App
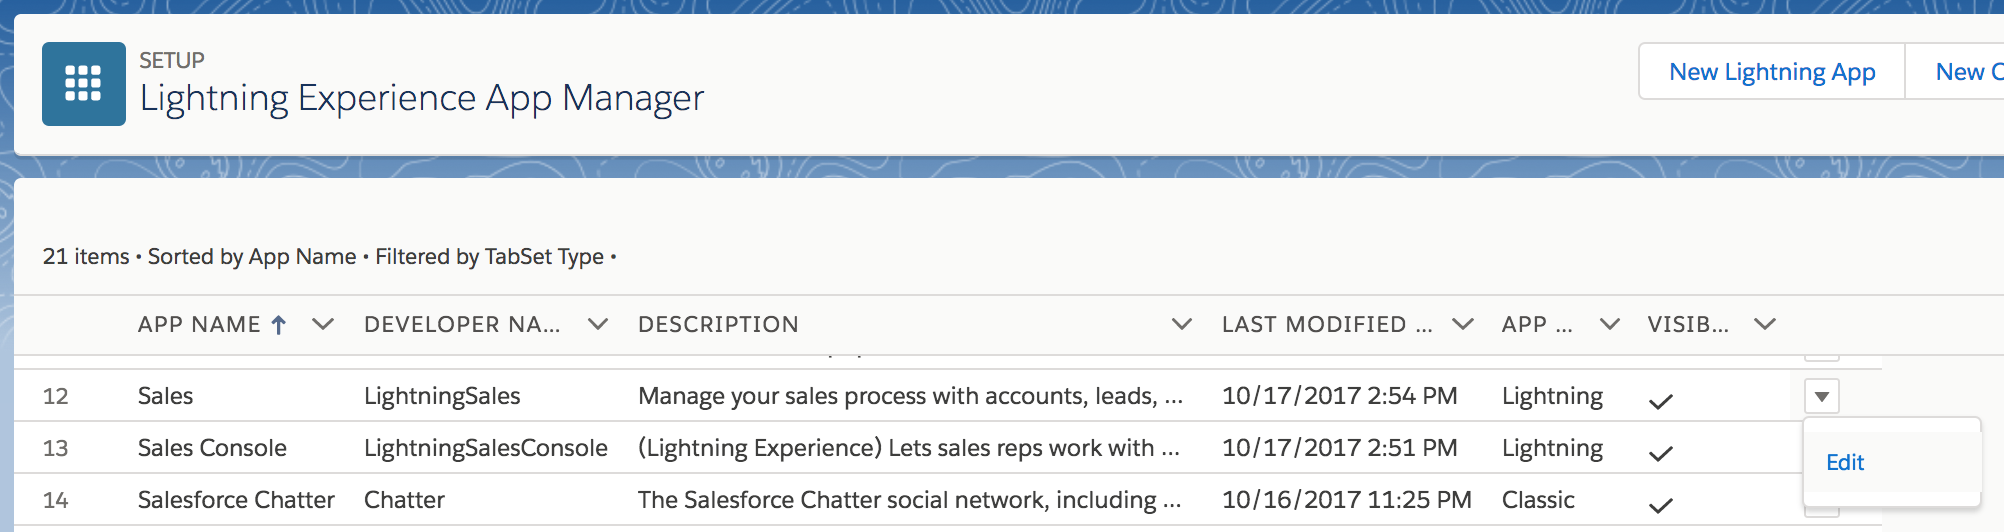
- Go to the App Manager
In the Setup > Quick Find, search for and click on App Manager
Select the "Lighting" app you wish to add the Webphone too by clicking Edit. For example, you can select the "LightningSales" app as shown below, another Lightning app or click New Lightning App.
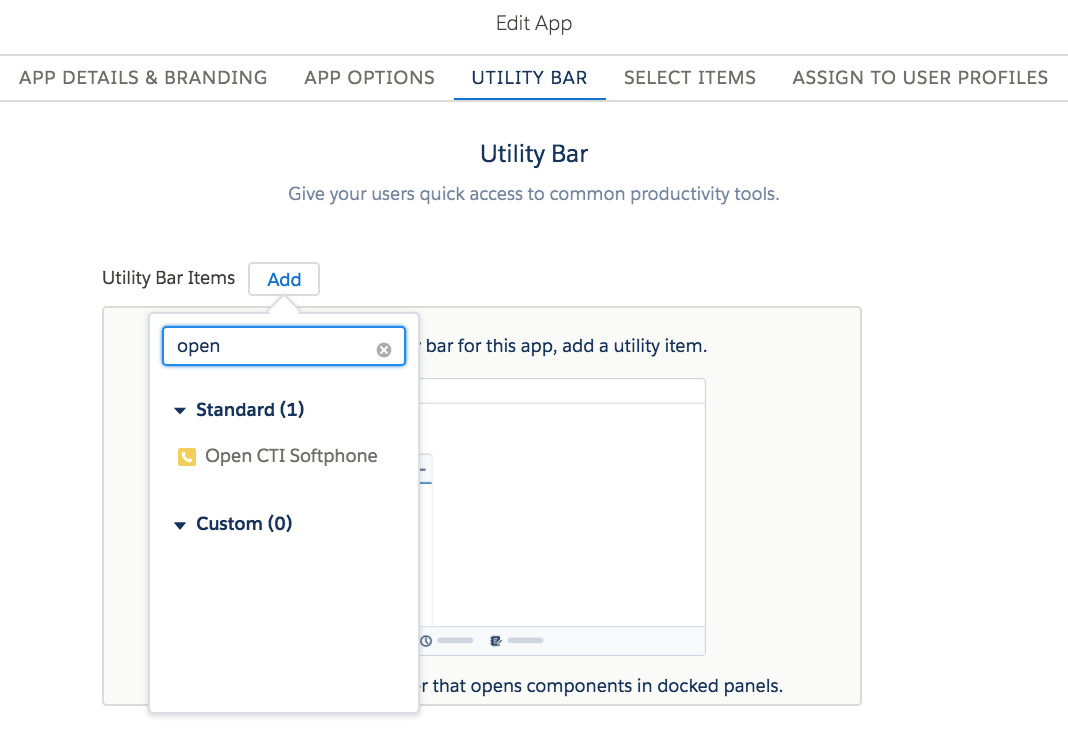
- Add Open CTI Softphone
Under the Utility Bar, click Add and then search for, and click, Open CTI Softphone.
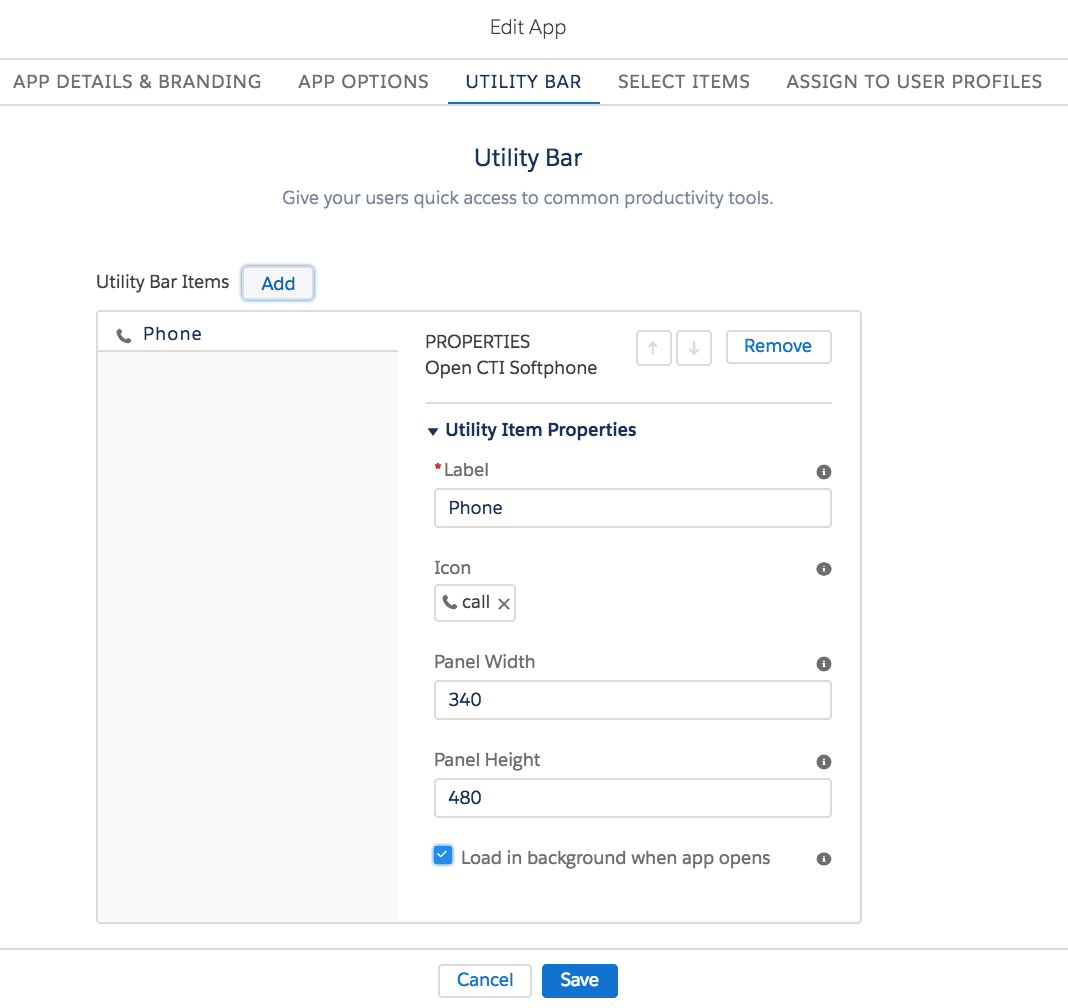
- You do not need to change any options. Click Save.
- Go to your Salesforce app via the App Launcher and bring up the RingCentral Web Widget
Integrations
The following section covers three primary use cases.
Click-to-Dial
To add click-to-dial to your RingCentral Widget in Salesforce, we want to call the sforce.opencti.enableClickToDial() and sforce.opencti.onClickToDial() functions. We will register a fuction to the onClickToDial() function that uses the browser's Window.postMessage() function message to send a message which the Widget is listening for using the rc-adapter-new-call message type.
Code for this is shown below. Open your RCPhone Visualforce page and paste the code below the <apex:iframe> tag.
<script src="/support/api/40.0/lightning/opencti_min.js"></script>
<script>
   function postMessage(data) {
       document.getElementsByTagName('iframe')[0].contentWindow.postMessage(data, '*');
   }
   sforce.opencti.enableClickToDial();
   sforce.opencti.onClickToDial({
       listener: function(result) {
           postMessage({
               type: 'rc-adapter-new-call',
               phoneNumber: result.number,
               toCall: true,
           });
           sforce.opencti.setSoftphonePanelVisibility({ visible: true });
       }
   });
</script>
Inbound Screen-Pop
Apex class
Create the RCPhoneHelper Apex class if you don't already have one and add a searchContact method as shown below:
global class RCPhoneHelper {

    // Inbound Screen Pop
    webService static Contact searchContact(String phone) {
        List < List < SObject >> l = [FIND: phone IN PHONE FIELDS RETURNING Contact(Id limit 1)];
        if (l.size() > 0 && l[0].size() > 0) {
            return (Contact) l[0][0];
        }
        return null;
    }
}
Visualforce page
In your Visualforce page, create a receiveMessage function to respond to the rc-call-ring-notify event and register it using window.addEventListener as shown below. If you are listening to multiple RingCentral event types such as rc-call-end-notify as shown for the Call Log use case shown below, you can use an else if clause in the receiveMessage function.
function receiveMessage(event) {
    if (event.data.type === 'rc-call-ring-notify') {
        sforce.opencti.setSoftphonePanelVisibility({
            visible: true
        });
        var fromNumberE164 = event.data.call.from;
        var fromNumber = phoneUtils.formatNational(fromNumberE164, "us");
        if (fromNumber[0] === '+') {
            fromNumber = fromNumber.substring(1);
        }

        sforce.opencti.runApex({
            apexClass: 'RCPhoneHelper',
            methodName: 'searchContact',
            methodParams: 'phone=' + fromNumber,
            callback: function(response) {
                if (response.success == true) {
                    var contactId = response.returnValue.runApex.Id;
                    if (contactId !== null) {
                        sforce.opencti.screenPop({
                            type: sforce.opencti.SCREENPOP_TYPE.SOBJECT,
                            params: {
                                recordId: contactId
                            }
                        });
                    }
                }
            }
        });
    }
}
window.addEventListener("message", receiveMessage, false);
Automatic Call Logging
Apex Class
To enable automatical call logging, first create an Apex helper method. This method should be added to your RCPhoneHelper class added above.
// Call Logging
webService static void logACall(string contactId, Integer duration, String fromNumber, String toNumber) {
    Task t = new Task(
        ActivityDate = date.today(),
        CallDurationInSeconds = duration,
        CallType = 'Inbound',
        Description = 'From: ' + fromNumber + '\nTo: ' + toNumber + '\nDuration: ' + duration + ' seconds',
        Status = 'Completed',
        Subject = 'Call log',
        TaskSubtype = 'Call',
        Type = 'Call',
        WhoId = contactId
    );
    insert t;
}
Visualforce Page
Now add the Visualforce page JavaScript that will listen for the rc-call-end-notify event, look up the contact and, if found, create a Call Log Task.
The code below can be added to the receiveMessage() function added above in the Inbound Screen-Pop section.
else if (event.data.type === 'rc-call-end-notify') {
    if (event.data.call.startTime !== null) {
        var fromNumber = event.data.call.from;
        if (fromNumber[0] === '+') {
            fromNumber = fromNumber.substring(1);
        }
        sforce.opencti.runApex({
            apexClass: 'RCPhoneHelper',
            methodName: 'searchContact',
            methodParams: 'phone=' + fromNumber,
            callback: function(response) {
                if (response.success == true) {
                    var contactId = response.returnValue.runApex.Id;
                    if (contactId !== null) {
                        sforce.opencti.runApex({
                            apexClass: 'RCPhoneHelper',
                            methodName: 'logACall',
                            methodParams: 'contactId=' + contactId +
                                '&duration=' + Math.round((event.data.call.endTime - event.data.call.startTime) / 1000) +
                                '&fromNumber=' + event.data.call.from +
                                '&toNumber=' + event.data.call.to,
                            callback: function(rr) {
                                console.log(rr);
                            }
                        });
                    }
                }
            }
        });
    }
}
Summary
The above completes this tutorial on basic Salesforce Lightning configuration using the RingCentral Web Widget.
The next tutorial covers popular use cases where a user may want to extend the functionality of the Web Widget, such as opening additional Screen-Pops to look up the user's info in sites like Google Search and LinkedIn.
Next: Using the RingCentral Web Widget with Salesforce Lightning Google Search and LinkedIn